Subsections of Getting Started
Registration
In order to use the service, you’ll need a subscription to it, either via the hosted SaaS version at backupscale.com or an account set up with your organization for the corporate installation (self-hosted).
- For the SaaS version, sign up on the BackUpScale dashboard site, and then select and purchase a subscription plan.
- For the Enterprise (self-hosted) version, talk to the folks managing it for your organization.
In either case, you’ll need:
- Your username obtained through registration.
- One or more backup sources. These are the devices that that you’d like backed up.
Backup Source Requirements
You can have as many backup sources as you’d like with no additional cost. For each one you’d like to back up, ensure you are prepared to configure them with the steps below.
Generate an SSH key pair
Each backup source must have a Secure Shell (SSH) key pair owned by the Administrator or superuser root used for connecting to the backup service. The public keys must be provided to the service before you start running backups, ideally as part of registration. You can use the same key pair for all of your backup sources, different key pairs for each, or some other combination. As long as each device can connect the the backup serivce over SSH using one of your private keys, you’re good to go.
For the purposes of this exercise, we’re assuming that you don’t already have a key pair to use. If you do, you can skip these steps.
- Ensure that you have Administrator/
rootaccess on your device. - Start a terminal session as that user (or if you can, prefix the following command with
sudoas it’s safer). - Generate a key pair:
ssh-keygen -t ed25519 -C "device1"
- When asked where to save the key, the default location should be fine.
- When asked for a passphrase, DO NOT enter one; leave it blank. Password-protected keys will not work with the automation.
- Keep the generated public key, typically
id_ed25519.pub, handy as you’ll need to provide it when setting up your account.
You can now either copy this key pair to the same location on your other devices, or generate other key pairs for them the same way.
Generate and Store a Passphrase
- Your backups are encrypted using a passphrase which you will select and enter during the configuration stage.
- This passphrase cannot be recovered by the system if you lose it! It is required for restoring your backups. You must store it in a safe place!
Tip
If you have an organizational or personal vault that’s encrypted (if digital) or secure physically (if not, like an actual safe), that would be the best place to store this.
As most folks aren’t going to bother with a physical safe, either one they control or a safety deposit box at the bank, the next best option is a digital vault (which will also generate passwords for you), ideally controlled by you. A good example of this is KeePassXC. Otherwise, you can use one of several encrypted password management services, for example:
We’re not endorsing these, but are providing them as options you can look into yourself. You’re on your own if tney cause any problems for you.
Caution
- Don’t forget or lose your credentials or access to your vault.
- Keep a backup of your secrets just in case something happens to the physical location or digital service.
Info
Yes, we take backups very seriously.
Backup Source Installation
Add your devices to the backup network
Requirements
- Confirmation that your account has been set up
- The administrator password for your logged in user (needed for running the playbook)
- Your generated passphrase you’ve prepared
Installation
Determine how you’d like to install the necessary software on your devices. All of the software you need to install has publicly available code (open source) so it can be audited if necessary. For details, see Installation Software.
We provide an Ansible role and default playbook for automatic configuration of devices, with this repository actually structured as an Ansible collection containing both. If your organization uses another automated provisioning tool enabling infrastructure as code (IaC) such as Salt, Chef or Puppet, feel free to write an equivalent script (and then provide it to us so that we can share it with others). If you prefer to configure your backup sources manually (not recommended, but necessary if you have different set-up requirements, such as running the Backrest console in a Docker container instead of locally), you can review the included role to follow and possibly modify those steps.
Using our Ansible role
For more information on what our Ansible role actually does on your device, please review the role overview.
For a single backup source, run locally on the backup source or remotely targetting it
- Install Ansible by running the following command:
sudo apt install ansible
- Add a directory for Ansible collections:
mkdir --parents ~/.ansible/collections
- Clone this repository into your collections directory:
git clone https://gitlab.com/backupscale/customer-tools.git ~/.ansible/collections/customer-tools
- Run the Ansible playbook.
- Locally:
ansible-playbook --inventory localhost, --ask-become-pass --connection=local ~/.ansible/collections/customer-tools/playbooks/configure-backup-sources.yml - Remotely:
ansible-playbook --inventory REMOTE_HOSTNAME, --ask-become-pass ~/.ansible/collections/customer-tools/playbooks/configure-backup-sources.yml
- Locally:
- When it prompts you for a BECOME password, enter your own password to get
sudoaccess so that some tasks can run with administrator permissions (only the ones that need them).
Multiple remote targets, non-local
For multiple targets that aren’t local, you’d instead run something like this, or provide an inventory file:
ansible-playbook --inventory server1,server2,server3 /path/to/this/repository/playbooks/configure-backup-sources.yml- When it prompts you for a BECOME password, enter your own password to get
sudoaccess so that some tasks can run with administrator permissions (only the ones that need them).
Next Steps
We’re now ready to move onto configuration.
Backup Source Configuration
We’ll be configuring the set-up in our recommended management console, Backrest, which was installed in the previous section. For additional documentation not provided here, please review the Backrest documentation.
Subsections of Backup Source Configuration
Management Console Configuration
- Point your browser at the Backrest console. This will typically be http://localhost:9898/ if you installed locally by following the default installation instructions.
- You should then see the following pop-up dialog box:
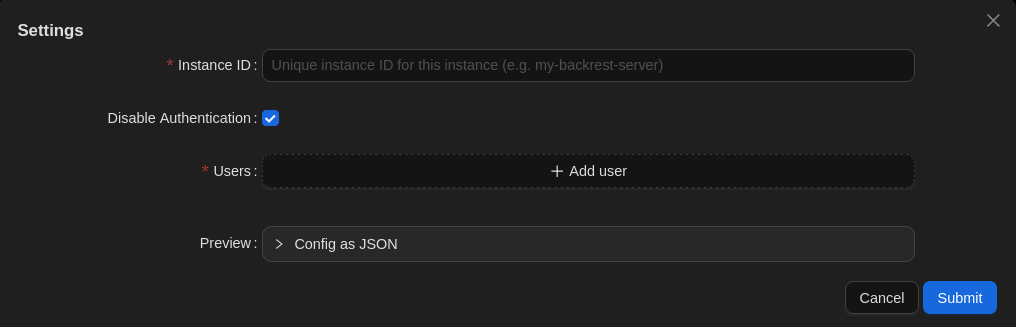
- Enter an Instance ID: The instance ID is a unique identifier for your Backrest instance. This is used to tag snapshots created by Backrest so that you can distinguish them from snapshots created by other instances. This is useful if you have multiple Backrest instances backing up to the same repo. It cannot be changed after initial configuration as it is stored in your snapshots. Choose a value carefully.
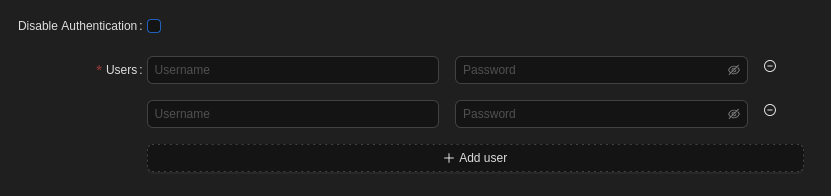
- Disable Authentication: If you’d like all users of this device administer your configuration (e.g. you’re the only user), you can leave this box checked because it can only be accessed from the device itself. Otherwise (e.g. you have other users that should not be able to alter settings), uncheck it.
- Users: Add credentials (username & password) for each administrator, including yourself, if you enabled authentication.
- Hit the Submit button to save the above settings.
Repository Instance Configuration
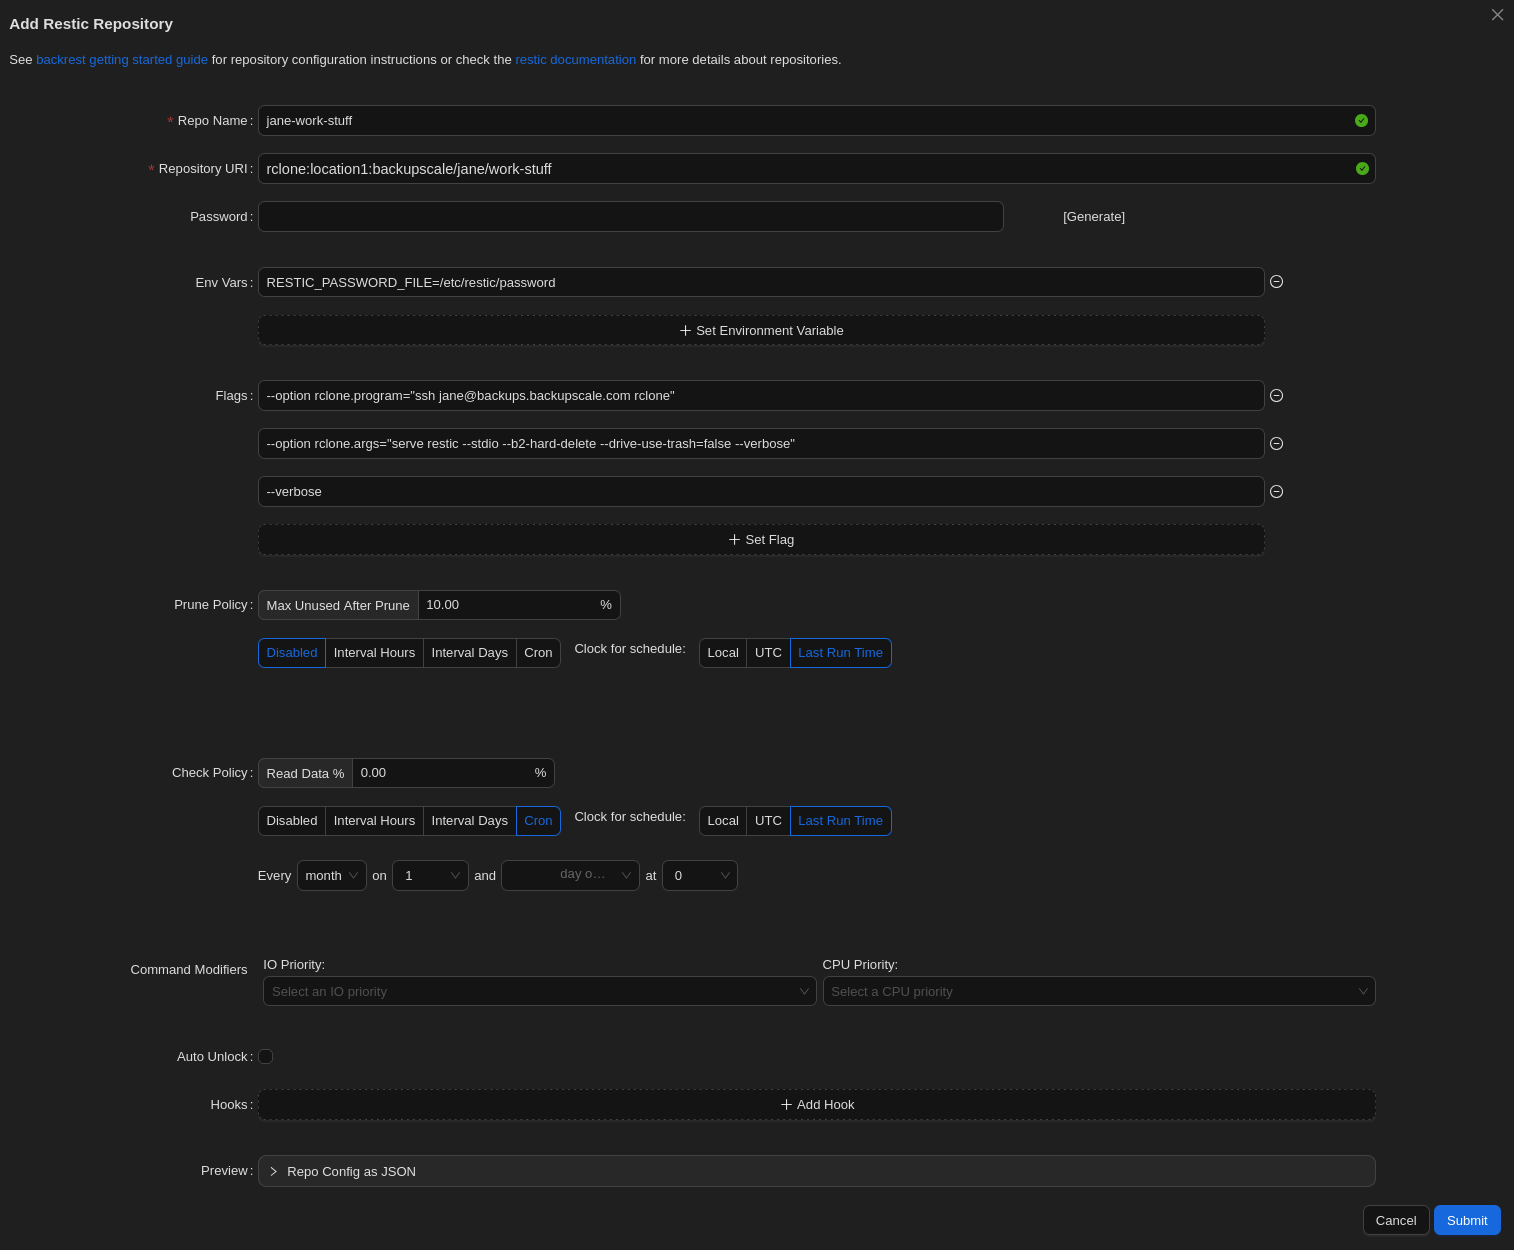
On the left sidebar, click on Repositories -> Add Repo.
Then, fill out the form. There’s an image of a filled form following the steps below.
Form Steps
- Repo Name: Enter whatever you’d like here; this is for identifying your repository in this user interface.
- Repository URI: Enter the following, with the region (only
europeis supported currently), your username for USER_NAME, and the ID you’d like for your repository for REPOSITORY_ID (but note the Caution below).rclone:europe:backupscale/USER_NAME/REPOSITORY_ID
Caution
Repository IDs must be between 3 and 63 characters (inclusive). They can contain lowercase letters, numbers and dashes (but not at the beginning or end).
- Password: Leave this field blank. We don’t need to generate one here because we’ll be using the passphrase we generated during the initial set-up.
- Env Vars: Enter the following to set up your environment with your passphrase.
RESTIC_PASSWORD_FILE=/etc/restic/password
- Flags: Here are the settings for working with BackUpScale repositories. Again, replace User_NAME with your username.
--option rclone.program="ssh USER_NAME@backups.backupscale.com rclone"--option rclone.args="serve restic --stdio --b2-hard-delete --drive-use-trash=false --verbose"--verbose
Info
Rclone is the tool we use to marshal your encrypted files to and from our cloud storage service.
- Prune Policy: Hit the Disabled button. This option is for removing no-longer-needed data from your repository, but we can’t automate this here because your repositories are normally in append-only mode to enhance security. Therefore, data cannot be removed with this method. To do so, see Removing Snapshots for information on how to do it elsewhere.
- Check Policy: This isn’t required, but if you’d like to verify the integrity of your repository periodically, you can enable this by setting it to something higher than 0%. However, this this is a resource-intensive operation so we don’t recommend checking more than 10% at once.
- Command Modifiers: Feel free to set these to something other than the defaults to match your resource management requirements.
- Auto Unlock: Leave this disabled.
Caution
Enabling this could corrupt your backup repository. Leave it off unless you really know what you’re doing.
- Hooks: You can hook into operations run here. See Hook Details for more information.
- Preview: This is simply for reviewing how the the above configuration will be stored, which can be helpful for automation.
- Hit the Submit button to save the form.
Example of a filled form
Repository Scheduling Configuration
- Plan Name: Enter whatever you’d like here; this is for identifying your plan in this user interface.
- Repository: Select one of the repositories you created in the previous section.
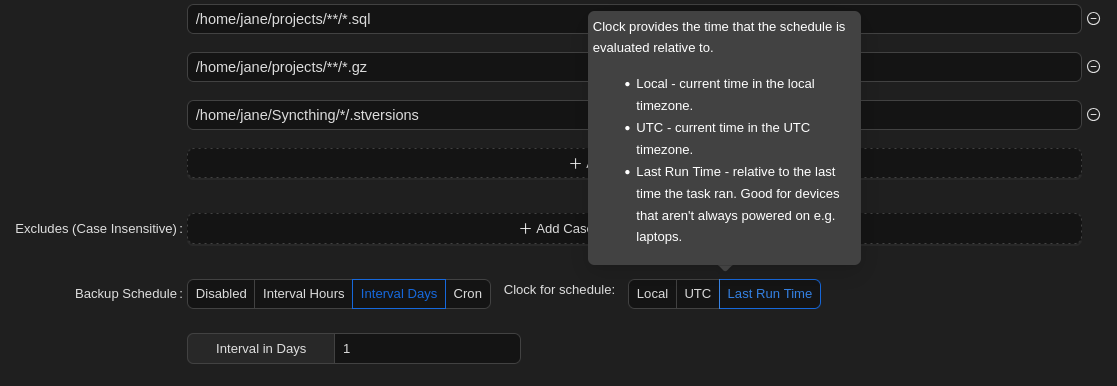
- Paths: Enter the paths on your device that you’d like backed up.
- Excludes: Case-sensitive paths to exclude from your backups that are contained within the above paths. See the Restic documentation for details.
- Excludes (Case Insensitive): Same as above, but the paths aren’t case sensitive. See the Restic documentation for details.
- Backup Schedule: The backup schedule. You can hover over each option for in-line help.
- Backup Flags: Set any options you’d like to add to the backup command. For example, we recommend not creating new snapshots if the files haven’t changed:
--skip-if-unchanged
- Retention Policy: Set this to None because we’ll normally be working with append-only repositories, which don’t allow marking snapshot removals. Instead, we’ll handle this via out-of-band operations, where we temporarily disable append-only mode.
- Hooks: You can hook into operations run here. See Hook Details for more information.
- Preview: This is simply for reviewing how the the above configuration will be stored, which can be helpful for automation.
- Hit the Submit button to save the form.
- After your Plan has been created, while on the Plan, hit the Backup Now button to start your first backup and test you configuration.
Note
If you’re backing up lots of data (either lots of files and/or big files), it may take a while for your backup task to complete. After your first backup, however, there will be fewer changes to upload so backup operations will be quicker.